
Moving on in… Welcome to my New Studio
I love how life works. I take the time to really clean up and reorganize my studio and less than a month later move my studio out of the apartment! Which is wonderful, just kind of funny timing. It actually made the move much easier than it would have been before I organized my studio. It was really just a matter of putting all my containers of stuff into a moving truck and then fitting them into the new space. This all happened so quickly and it was really in a matter of a week that the space opened up, we talked things out, and I moved in. Hence the light posting last week. I am tempted to say I really “lucked out” but Jason reminded me that I’ve been working really hard towards this move for a long time now. In many ways, it’s a dream come true. Actually in all ways!

This is my “office”. I never thought I would work in a cubical, but it was actually a great way to divide up the space, give me more working area, and have a designated “office” in my working space. I keep my programing, design, business, current reading, and library books on my cube shelf. All my “business” papers – contracts, recipts, tax stuff, supply catalogs, and the like go in the filing cabinets fitted under the work surface. I have bulletin boards behind my computer, but they have yet to be filled with anything more than a print out of the current iCal month – so I can jot down post schedule ideas and keep a continual reminder of what’s on my plate for the month – a lot!

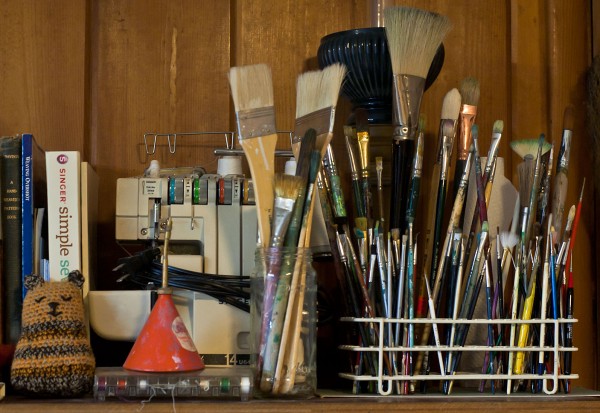
I love this part of my new space. I have all my craft, most my art, zines, craft magazines, and other inspiring books on the shelves.

{I love this shelf!}
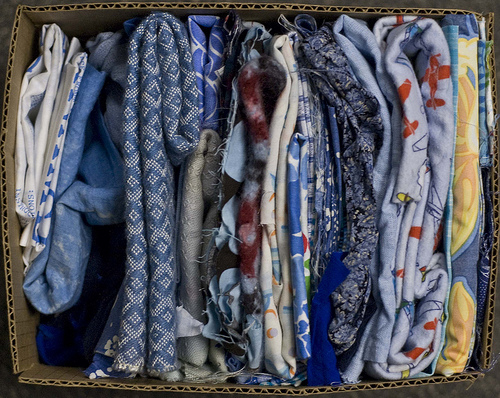
Then I have most my fabric in the shelves (I’m in the process of ironing and reorganizing it so it’s still sloppy). Then in the metal cabinet next to where the fabric is, I have all my tools!
 General crafting supplies, my surger, polymer clay stuff, beading stuff, ink stuff, metal working, kit making, stapling, ironing, printing, beading, and embroidery. All there. All organized. I love it!

And here is a closer view of my “office” area. I picked up a panflute while my friend was in town over the weekend and have a few of my other favorite things up on the shelf – like a jar of marbles from when I was a kid, a cup a made in ceramics, and the pink panther plushy I used to carry around with me all the time until I was like 11.

And here is the view from my desk. You can see off to the right how I now can use my utility shelf as a designated workspace for assembling, photographing, and sending out kits and zines. I like that I can just have my lightbox set up and out of the way for use at a moments notice. Hopefully now my post pictuers will start being better because I won’t be so lazy.

And here is the view if you are standing by the fabric shelf. It’s pretty barren right now. I’m trying to figure out some ideas on how to spruce up the space with some color using a quick and easy method. I don’t want to spend a lot of money or time, but I want it to look nicer than it does now. Oh and off to the right, that’s my third work area, I’m using that for sewing or if I have a friend over they have a workspace. And sometime next year I hope to get an intern to help with some behind the scenes projects so I don’t go crazy. And that would be their work area where I would set them up with a computer to work on or where they could do more creative projects. We will see how it works out. There is a program at Iowa State University, so I think maybe a business student who is into crafts, a graphic design student, or a fashion design student whose interesting in writing patterns? I’m not sure. We will see in a few months.
So any ideas for the back wall?
The wall above the utility shelves will have a peg board with tools on it soon. And I want to get some shelves to go along the ceiling. Oh and you can’t see it, but my cello is in the corner and soon there will be a copy machine over there too, so that area will be less open. If it weren’t for the copy machine, I think I would set up an over stuffed chair in the corner with a side table when I just need to sit back and knit on a project – like I am going to do today for Friday’s project.
Leave a comment and give me some feedback on the new space and ideas for the wall! I’m hoping to have a solution worked out and in place by next Tuesday.
Happy crafting!
Krsitin
ps – I’ve been getting a ridiculous amount of spam both in email and comment form lately, so if it takes awhile for your comments to show up, I apologize! I’m working on getting a better spam filter for the blog here. Oh and on another note. If you tried to send email to kristin@craftleftovers.com and it was bounced back saying my mailbox was full, that’s all fixed too. It was another side effect of my allotted disk space on the server being full. We’ve upped the limit and it should be all good now.
Wow, that’s a nice space! I’d suggest having an “inspiration” wall in that blank space. I’m sure you can easily find lots of art and craft inspirations there. Photographs…color cards…fabric swatches…
Your new workspace looks so neat, Kristin! :-)
As for the ideas, here in Montreal, we have a place called “Arthotheque” where you can rent art. It’s a very reasonnable monthly fee for the art rent and you can try different kind of paintings to see what you like best. Perhaps you have something similar where you live?
If I were you, I’d get a huge painting/poster to cover this wall. Maybe something abstract or with just a couple of colors? Or a huge mirror? Or some top shelves? Just ideas!:-)
Wow, what an amazing new space. Keep us updated as you organize and improve it, I love to see how other people use their workspaces. For the back wall, how about a big chalkboard. You could use chalkboard paint right on the wall. I work at a paint store an we have tintable chalkboard paint, so it can be any color you want instead of the traditional black or green. We also have dry erase board paint! It would be a great place for to do lists, design ideas, inspirational thought, etc.
Congratulations on your new studio! It must feel really good.
Congratulations! This is magnificent – so much space to work on lots of different creative efforts. I’m so thrilled for you!
I can see that wall as some kind of big inspiration board. Can you tape or pin stuff to it?