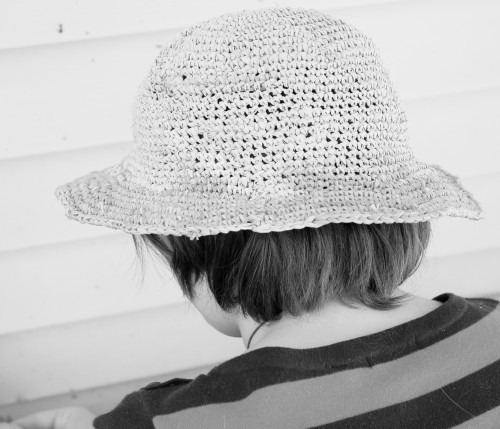
I love working in my garden in the summer, but after about 10am it becomes blistering hot. This hat is made out of a grass like material called raffia and keeps the sun off your head, ears, and neck. At the same time keeping you cool by letting the breeze through the open stitch work. Working with Raffia can be challenging unless you know a few simple tricks. In this pattern I’ll teach you everything you need to make it slide right off the hook.
::Materials and Tools Needed::
- Size G hook

- 1 bundle basketry raffia (approx. 4 oz.)
- 1 bucket of water for wetting material
- Apron – for keeping your clothing neat and tidy
::Abbreviations::
- sc – single crochet
- ch – chain
- sl st – slip stitch
- rnd – round
- st – stitch
::Techniques Used::
- single crochet
- slip stitch
- working in the round
Directions:
Notes:
Working with Raffia can be challenging to work with unless you know a few simple tricks that will
make it slide off the hook.
The first thing is that it is stiff and brittle. Just like with basketry, soaking it in water will make the material more pliable and easier to work with.
The second thing is that the pieces are only a few feet long each. Instead of trying to weave in all the
ends after the fact, simply overlap the old piece with the new piece about 3 inches and work as if it
were one continuous piece – again, similar in fashion to basket weaving methods.
Getting Your Sun Hat Started:
Using a crocheted magic loop to work 8 single crochet stitches, join the last to the first
with a slip stitch.
Rnd 1: Ch1 (counts as first sc), 1sc into base of ch1; 2sc into each sc st to end. Join to beg of rnd with
a sl st. — 16 sts.
*Note: It’s a good idea to mark the beginning of the round with a stitch holder, moving it
from the ch1 stitch to the next as you start each new round.*
Rnd 2: Ch1, 1sc into base of ch1, sc in next sc, *2sc in next sc, sc in next sc; repeat from * to end.
Join to beg of rnd with a sl st. — 24 sts.
Rnd 3: Ch1, 1sc into base of ch1, sc in each next 2 sc; *2sc in next sc, sc in each next 2 sc; repeat
from * to end. Join to beg of rnd with a sl st.– 32 sts.
Rnd 4: Ch1, 1sc into base of ch1, sc in each next 3 sc, *2sc in next sc, sc in each next 3 sc; repeat
from * to end. Join to beg of rnd with a sl st.– 40 sts.
Rnd 5: Ch1, 1sc into base of ch1, sc in each next 4 sc; *2sc in next sc, sc in each next 4 sc; repeat
from * to end. Join to beg of rnd with a sl st.– 48 sts.
Rnd 6: Ch1, 1sc into base of ch1, sc in each next 5 sc; *2sc in next sc, sc in each next 5 sc; repeat
from * to end. Join to beg of rnd with a sl st.– 56 sts.
Rnd 7: Ch1, 1sc into base of ch1, sc in each next 6 sc; *2sc in next sc, sc in each next 6 sc; repeat
from * to end. Join to beg of rnd with a sl st.– 64 sts.
Rnd 8: Ch1, 1sc into base of ch1, sc in each next 7 sc; *2sc in next sc, sc in each next 7 sc; repeat
from * to end. Join to beg of rnd with a sl st.– 72 sts.
*Note: mark last increase round with a latching stitch marker – this will make it easier to
measure from that point.*
Rnd 9: Ch1, 1sc into base of ch1, sc in each next 8 sc; *2sc in next sc, sc in each next 8 sc; repeat
from * to end. Join to beg of rnd with a sl st.– 80 sts.
Repeat round 9 until hat top is 3 1/2 inches from last decrease round.
Making the Brim:
Rnd 1: Ch1, 1sc into base of ch1, sc in each next 9 sc; *2sc in next sc, sc in each next 9 sc; repeat
from * to end. Join to beg of rnd with a sl st.– 88 sts.
Rnd 2: Ch1, 1sc into base of ch1, sc in each next 10 sc; *2sc in next sc, sc in each next 10 sc; repeat
from * to end. Join to beg of rnd with a sl st.– 96 sts.
Rnd 3: Ch1, 1sc into base of ch1, sc in each next 11 sc; *2sc in next sc, sc in each next 11 sc; repeat
from * to end. Join to beg of rnd with a sl st.– 104 sts.
Rnd 4: Ch1, 1sc into base of ch1, sc in each next 12 sc; *2sc in next sc, sc in each next 12 sc; repeat
from * to end. Join to beg of rnd with a sl st.– 112 sts.
Rnd 5: Ch1, 1sc into base of ch1, sc in each next 13 sc; *2sc in next sc, sc in each next 13 sc; repeat
from * to end. Join to beg of rnd with a sl st.– 120 sts.
Rnd 6: Ch1, 1sc into base of ch1, sc in each next 14 sc; *2sc in next sc, sc in each next 14 sc; repeat
from * to end. Join to beg of rnd with a sl st.– 128 sts.
Rnd 7: Ch1, 1sc into base of ch1, sc in each next 15 sc; *2sc in next sc, sc in each next 15 sc; repeat
from * to end. Join to beg of rnd with a sl st.– 136 sts.
Rnd 8: Ch1, 1sc into base of ch1, sc in each next 16 sc; *2sc in next sc, sc in each next 16 sc; repeat
from * to end. Join to beg of rnd with a sl st.– 144 sts.
Finishing:
To finish, fasten off and weave in the ends. Snip off all ends that are poking out everywhere.
It’s always a good idea to block your hat to help the stitches even out, especially because the cap will
dry out while the brim is still being worked causing an uneven tension throughout.
Place the hat in the bucket of water until it is soaked through. Remove from the bucket and let the water drain off. Put a towel down with a bowl right side down that is about the size of your head. Place the hat over the bowl and let the brim flatten out. Let the hat set until it is all the way dry.
This pattern was originally written for a local summer crochet class I taught at the Rose Tree Fiber Shop. We used up all this great raffia that was in the shop since the 70’s. In some ways, it felt like we were using up Rosemary’s stash :)
Happy Crocheting!
Kristin Roach

I love it! I'm going to start mine this afternooon.
Excellent! Let me know if you have any questions!
I love it! I'm going to start mine this afternooon.
Excellent! Let me know if you have any questions!