
Guest Designer :: Free Needle Point Leaf Ornament Pattern!
I was lucky enough to be contacted by Janet of Napa Needle Point about doing a guest pattern for Craft Leftover! Splendid! Of course! And I think the fates are aligning because it was while I was working on 2 needle point embroidery kits and then doing the first sketches of my own needle point ornament! Good timing too because needle point is great for leftover yarn and takes a little longer than other ornaments. We all still have plenty of time to make our own needle point leaf ornaments! Wonderful! And if you change up the colors, it could be a beautiful snowflake too!
Materials:
– Square of 14 mesh needlepoint canvas, 7 inches square
– 4 colors of leftover knitting yarn, as follows:
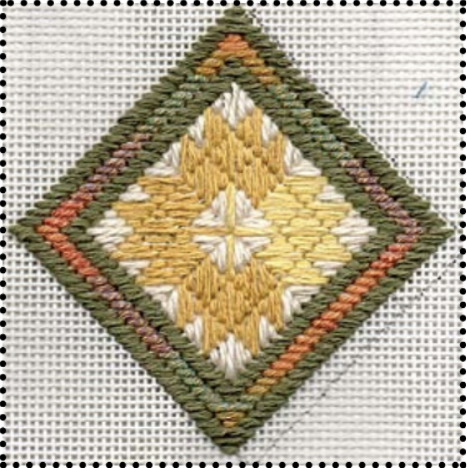
- 1 leafy color (yellow in model)
- 1 background color (cream in model)
- 1 multi-colored which has leaf color in it (middle border in model)
- 1 accent color which is in multi-color
(green in model)
Notes about Materials:
If you have friends who stitch the chances are that they might have some canvas to give to you. In addition, needlepoint shops often have small buts of canvas leftover from other pieces they sell and sell them at a discount. I always keep a bunch of mine for these leftover projects.
The knitting yarn you pick should be about DK weight or a thick sock weight and should be even in width. Needlepoint is not the technique for nubby yarns. Many knitting yarns have more than one strand in them and can be thinning by pulling out one or more strands.
You will need four yards of yellow and green, about 1-2 of cream, and 2 of multi-color.
– Needlepoint is done very simply, following the chart bring your needle up in one hole (a square on the chart), skip over the correct number of holes and bring the needle back down into another hole.
– To make the diamond shape, the stitches are of different sizes.
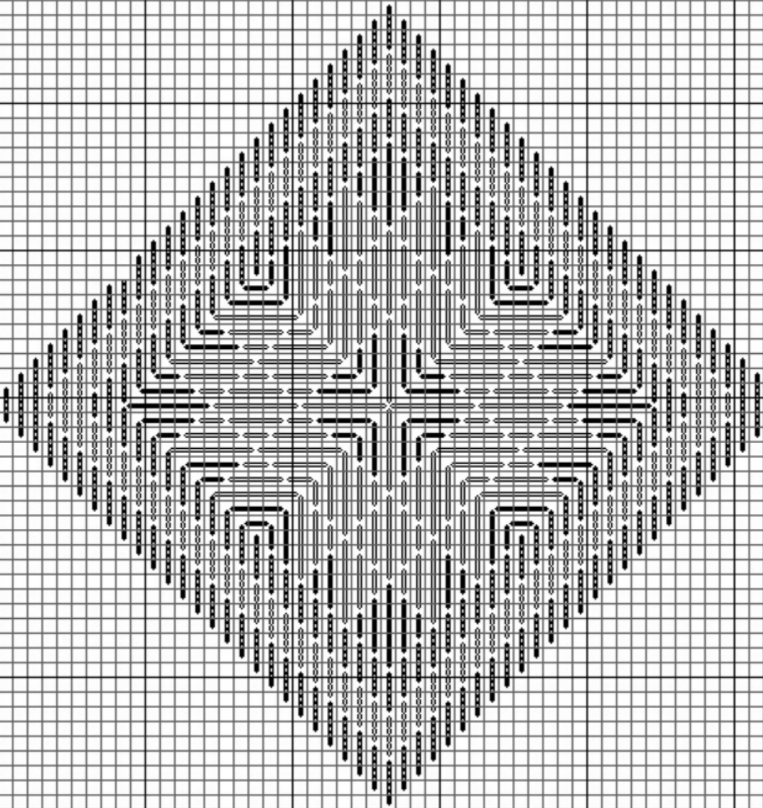
– Start by finding the center hole and stitch the “stem” of the leaf. Complete stitching that one leaf and its background.
– Go back to the center and stitch a second leaf. You’ll notice that where two leaves meet the stitches make a right angle. You’ll also note that each leaf is made of a bunch of diamonds and partial diamonds. These stitches mimic the patches of the quilt on which this ornament is based.
– Once you have stitched the center section, stitch the borders. There are three of them and they go all the way around the ornament.
Finishing:
– Once you have completed the ornament, cut it out five threads beyond each of the points of the
diamond, making a big square, with the diamond almost touching the middle point of each square.
– Turn under that five stitch margin to make a clean edge and fold those unstitched corners to the back.
Now the stitching is on the front and the unstitched canvas is on the back.
– Take a loop of ribbon to be a hanger and tuck it between the stitching and the folded canvas at one of
the corners.
– Bring two of the folded corner to meet each other and stitch them together by bringing the needle out of the canvas on one side of the seam and back into the canvas on the other side of the seam. Go back and cross over the stitches you have already made.
– Do this for each corner, until the ornament is stitched together. Take some felt and trace the ornament on it. Cut out the felt about 1/8” smaller all around and glue it to the back of the ornament.
Kristin
Find more free patterns at http://www.craftleftovers.com
This pattern is Copyright 2002-2008 (inclusive), Napa Needlepoint. All rights are reserved.
Personal Use Only.


Beautiful pattern! Janet does such great work. I’m loving seeing all this needlepoint on your blog lately!