
DIY Plant Markers – Stick it up!
My friend Michelle has been helping me in the garden this year in exchange for a share of the bounty. It has been a boon!
We dug the garden, corralled chickens, planted all the plants and seeds (on time, even early) — which I’ve never managed to do before. She keeps me on top of things and inspires me to keep up with weeding, watering, and harvesting.
It’s lovely to have a partner.

I know all my plants, she knows all her plants, but I can’t seem to remember which is a mung bean and which ones are chickpeas. And she can’t remember which peas are for shelling and which ones are for stir-fry.
I don’t think either of us remembers what tomato plant is what because we have 12 of them out there now!
We wrote it all down as we planted, but when we are out weeding and poking around, it would be so nice to just look down and know.
So earlier in the week I rounded up all the best ideas I found on making diy plant markers. Something that will hold up for the season at least. And of course, I didn’t make any of them. Instead I made my own!

At first I thought using tin cans would be perfect and divized this way it would just look so sharp — that didn’t work out at all for just about every reason you may think of (cutting the can, the ridges, sharp edges, lack of metal stamping tools, etc). So I literally tossed it – well, recycled.
I had really liked the french rustic ones and the stick gnomes. But I really wanted something that was simple, fast, would hold up for the season, and just tell us what plants we were looking at.
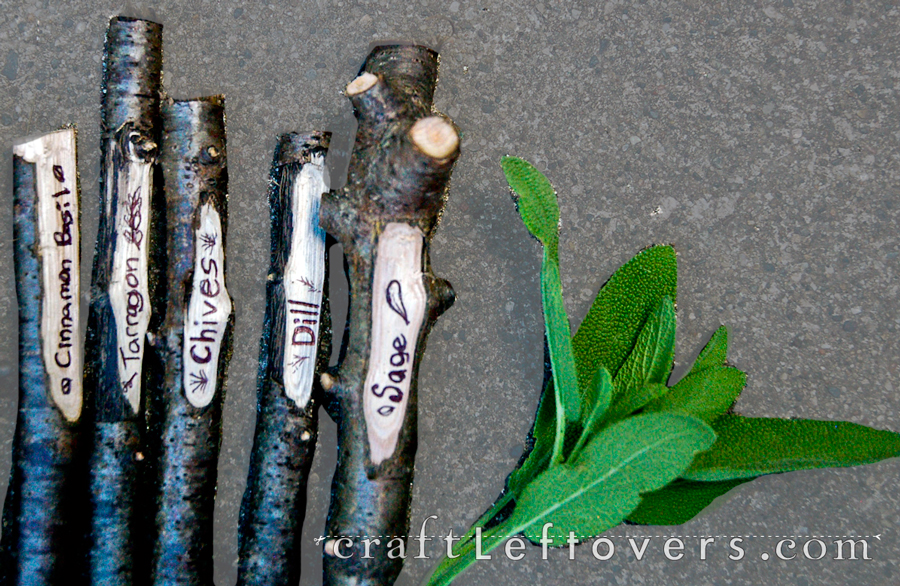
Hence the stick, a craft knife, and a ball point pen.
I did think about burning the names into the wood with a soildering iron, but it doesn’t get hot enough. I almost went to hobby lobby and bought a wood burning tool AND some metal stamping tools. But then I realized, “hey, that would make these little plant markers go from $0 to about $30 in just a matter of a 15 minute moment of insanity.” So if you have metal embossing tools OR a wood burning tool, that might be a great way to mark your plant names onto the sticks.
For me, I went SUPER low tech cheap-y-pants and used, Ta-da, a ball point pen.

But hey, this is a fancy ball point pen – it’s a RAGBRAI Pen! (The Register’s Annual Great Bicycle Ride Across Iowa, a 7 day ride covering about 75 miles give or take each day). Which I’m super excited to say I’ll be riding for the first time this year!
I just remember writing with a ball point pen on the picnic table when I was a kid and my mom getting upset because it was going to “not come off” and, well, it didn’t for about a year or so. Good enough for me.
You could always seal it if you feel so toxically inclined.
The pressure of the pen (just push hard when you write) should be enough to emboss it a bit, even if the ink does wash away in the rain.
Perfect.
Here’s all you need to make your own
- Craft Knife of a handy pocket knife
- Sticks about 1/2” in diameter
- Ball Point Pen
- Garden Shears

Cut the sticks (pick dried out ones if you can) so they are about 12” long. You want it to be long enough to shove into the dirt.
You can taper one end to a point if you want, but I found it to be pretty unnecessary and skipped doing so after making the first one. But the soil is nice and damp after our thunderstorm last night.

Take the craft knife and whittle away a 2-3” strip, creating a flat surface to write on.

Clean up the edges, peel away the bark, carve decorative things if you want. All optional.

Then, write out your plant’s name in the flat area. You can also write it out with pencil first. Actually, pencil might work really well. Again, use a heavy hand so it carves into the wood a bit.

And that’s it. You are all done. Well, almost. Now do it all over again for all your plants. So they can match. And you don’t want any of them feeling left out. I doubt they’ll appreciate the lack of attention even if you tell them “well I already know you so well that you don’t need a plant marker”.
Happy crafting and gardening! It’s a great time to be outside (up north anyway, haha).
Kristin
- Follow Craft Leftovers on Twitter
- Like Craft Leftovers on Facebook
- Join the Discussion on Google +
- Sign up for the Craft Leftovers eNewsletter
- Subscribe to the RSS Feed


What a great idea!!!!! Sometimes the simplest and cheapest is the best way to go.
Absolutely! Thanks mom, glad you like it :)
I love these, they are most excellent. Thanks for sharing. :O)
Just found your site!! Great idea, the cutest I’ve seen for plant markers.
Oh good, I’m glad you like them! Thanks! Make sure to check out the free pattern archive too. The posts are all organized by category and there’s loads of stuff in there! Enjoy!
I love this idea saves me money and its easy to do,i am well retired and got to keep my hands busy so i will be doing some of these.Thank you
I’m actually going to make these for my Dad for Christmas, I’m going to present them by tying them with ribbon, and making a cute label! Thanks for this!